> For the complete documentation index, see [llms.txt](https://zerc20.gitbook.io/zerc20/llms.txt). Markdown versions of documentation pages are available by appending `.md` to page URLs; this page is available as [Markdown](https://zerc20.gitbook.io/zerc20/for-users/getting-started.md).

# Using Frontend

This guide walks you through using the zERC20 web application.

## Step 1: Access the Frontend

Visit the [zERC20 Frontend](https://app.zerc20.io/).

> **Testing?** Use the [Testnet Frontend](https://v2.testnet.app.zerc20.io/) for testing with test tokens.

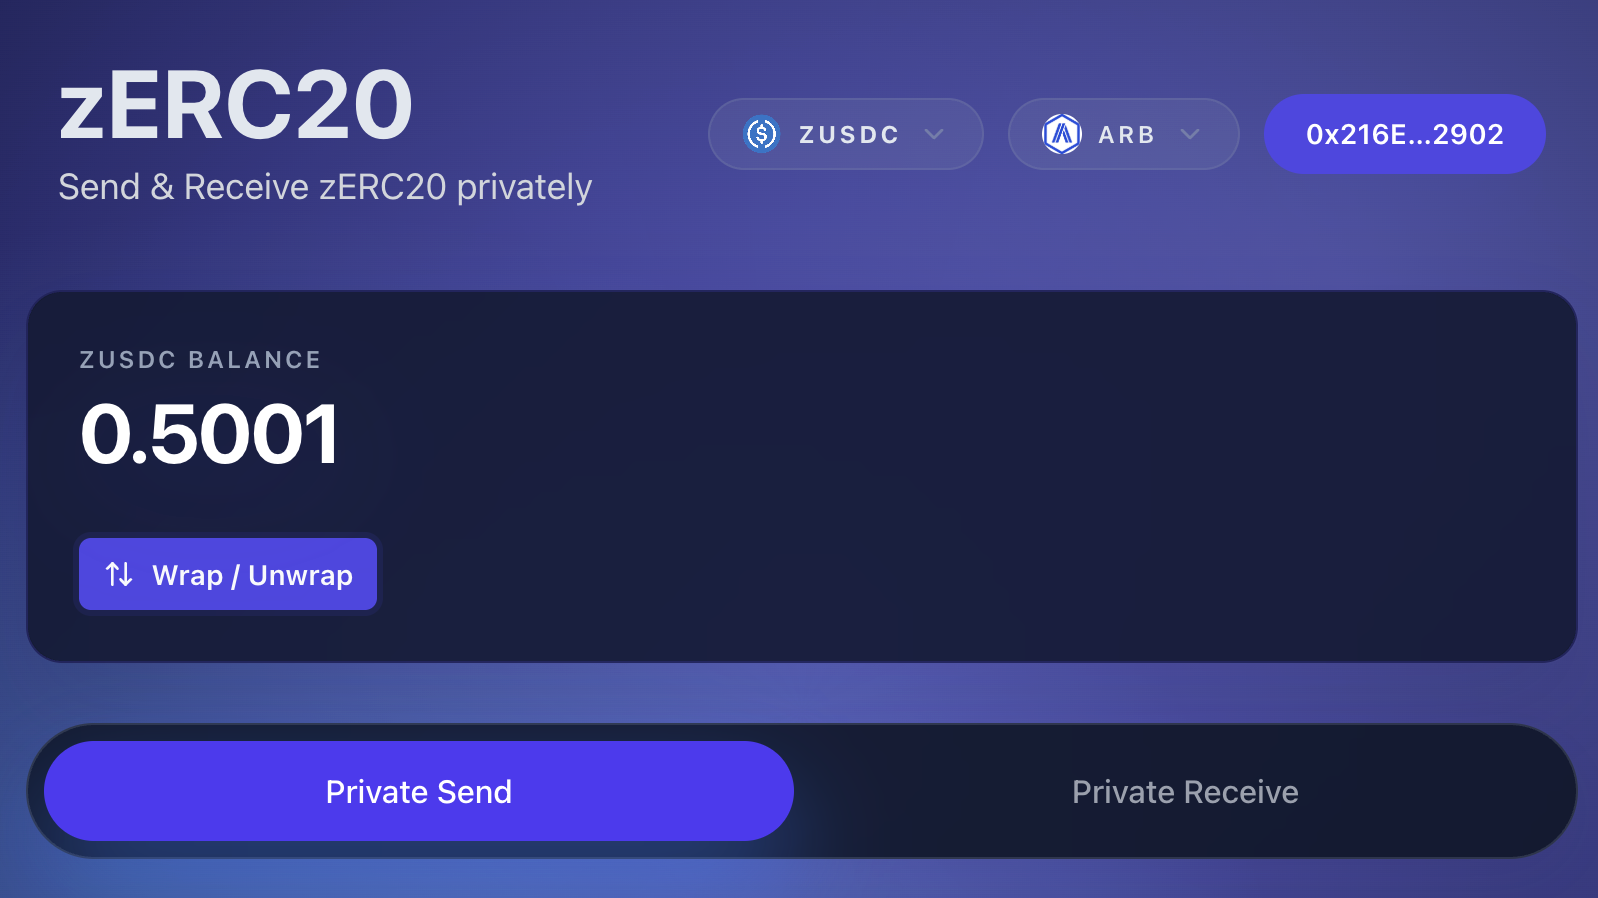
<figure><img src="https://4045326033-files.gitbook.io/~/files/v0/b/gitbook-x-prod.appspot.com/o/spaces%2FPzVlZxykzlnrD14epWVc%2Fuploads%2Fgit-blob-8b881c401646f30e853a29f5075404f6fb085d1a%2Fdashboard-overview.png?alt=media" alt="Dashboard Overview" width="560"><figcaption><p>Dashboard Overview</p></figcaption></figure>

## Step 2: Connect Your Wallet

1. Click "Connect Wallet" in the top right corner
2. Select your wallet provider (MetaMask, WalletConnect, etc.)
3. Approve the connection request in your wallet

Once connected, your wallet address and token balances will be displayed in the dashboard.

## Step 3: Get zERC20 Tokens

zERC20 tokens are ERC-20 wrapper tokens backed 1:1 by underlying assets. These tokens enable private transfers while maintaining full compatibility with the ERC-20 standard.

You can select the token type and chain from the dropdowns at the top of the page:

|                                                                                                        Token Selector                                                                                                       |                                                                                                        Chain Selector                                                                                                       |
| :-------------------------------------------------------------------------------------------------------------------------------------------------------------------------------------------------------------------------: | :-------------------------------------------------------------------------------------------------------------------------------------------------------------------------------------------------------------------------: |
| ![Token Selector](https://4045326033-files.gitbook.io/~/files/v0/b/gitbook-x-prod.appspot.com/o/spaces%2FPzVlZxykzlnrD14epWVc%2Fuploads%2Fgit-blob-3730966298610b054b99866278094f5a6cbbfda2%2Ftoken-selector.png?alt=media) | ![Chain Selector](https://4045326033-files.gitbook.io/~/files/v0/b/gitbook-x-prod.appspot.com/o/spaces%2FPzVlZxykzlnrD14epWVc%2Fuploads%2Fgit-blob-4099c342cbae5bcbaf7d5cdd698e4e67aac10ded%2Fchain-selector.png?alt=media) |

### Option A: Wrap Tokens

Wrapping converts your standard tokens (USDC, ETH, JPYC, etc.) into zERC20 tokens at a 1:1 ratio.

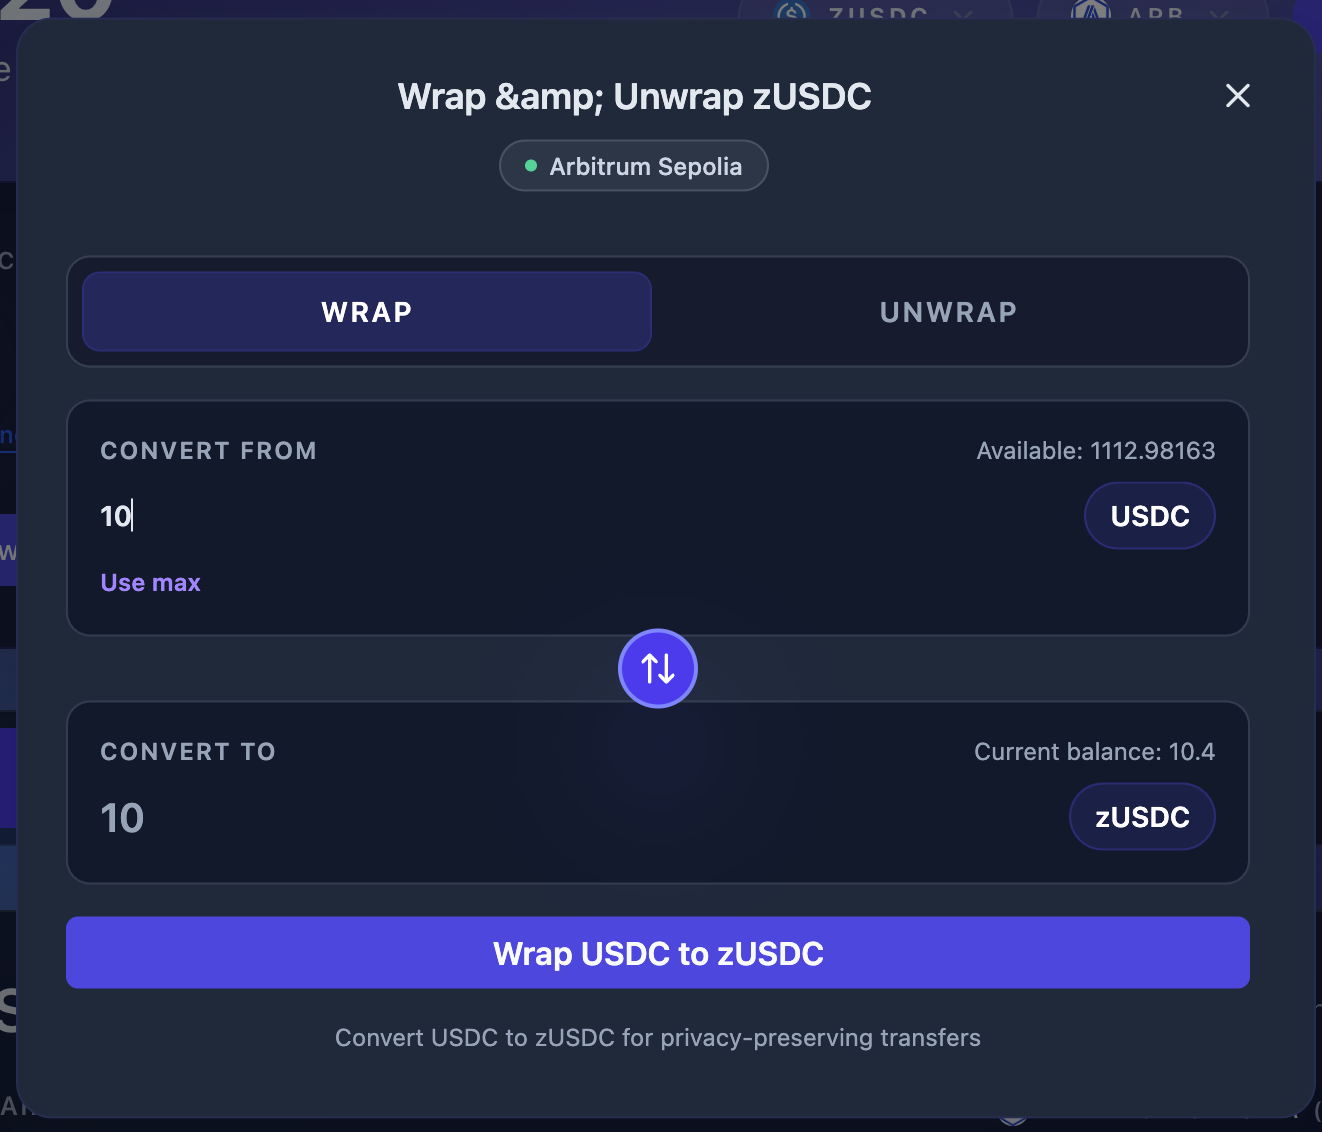
1. Click the "Wrap / Unwrap" button
2. Ensure the "WRAP" tab is selected
3. Select the token you want to wrap (USDC, ETH, BNB, JPYC, etc.)
4. Enter the amount to wrap

<figure><img src="https://4045326033-files.gitbook.io/~/files/v0/b/gitbook-x-prod.appspot.com/o/spaces%2FPzVlZxykzlnrD14epWVc%2Fuploads%2Fgit-blob-3ad9ca8adadaca0d98bad5dc38b1368150184b06%2Fwrap-modal-input.png?alt=media" alt="Wrap Modal with Amount" width="480"><figcaption><p>Wrap Modal - Enter amount to convert</p></figcaption></figure>

5. Click "Wrap USDC to zUSDC" (or the appropriate token)
6. Confirm the transaction in your wallet
7. Receive an equivalent amount of zERC20 tokens

> **Wrap Rewards**: If the chain has low liquidity, you may receive bonus tokens as a reward for adding liquidity. See [Fees and Rewards](/zerc20/for-users/fees-and-rewards.md) for details.

> **Testnet zJPYC**: On Kairos, use the JPYC test faucet for test JPYC and the [KAIA faucet](https://www.kaia.io/faucet) for native gas. zJPYC on Polygon Amoy and Kairos is local-mode, so each chain is handled independently.

After wrapping, your balance will be updated:

<figure><img src="https://4045326033-files.gitbook.io/~/files/v0/b/gitbook-x-prod.appspot.com/o/spaces%2FPzVlZxykzlnrD14epWVc%2Fuploads%2Fgit-blob-8b881c401646f30e853a29f5075404f6fb085d1a%2Fdashboard-overview.png?alt=media" alt="Dashboard After Wrap" width="560"><figcaption><p>Dashboard showing updated zERC20 balance</p></figcaption></figure>

### Option B: Buy on a DEX

Purchase zERC20 directly on decentralized exchanges like Uniswap.

> Check [Contract Addresses](/zerc20/reference/addresses.md) for token addresses on each chain.

### Unwrapping zERC20 Tokens

To convert zERC20 tokens back to the underlying asset:

1. Click the "Wrap / Unwrap" button
2. Select the "UNWRAP" tab
3. Enter the amount to unwrap
4. Set your preferred slippage tolerance (0.5%, 3%, 10%, or Custom)
5. Select the destination chain from the "UNWRAP ON" dropdown

**Same Chain Unwrap:**

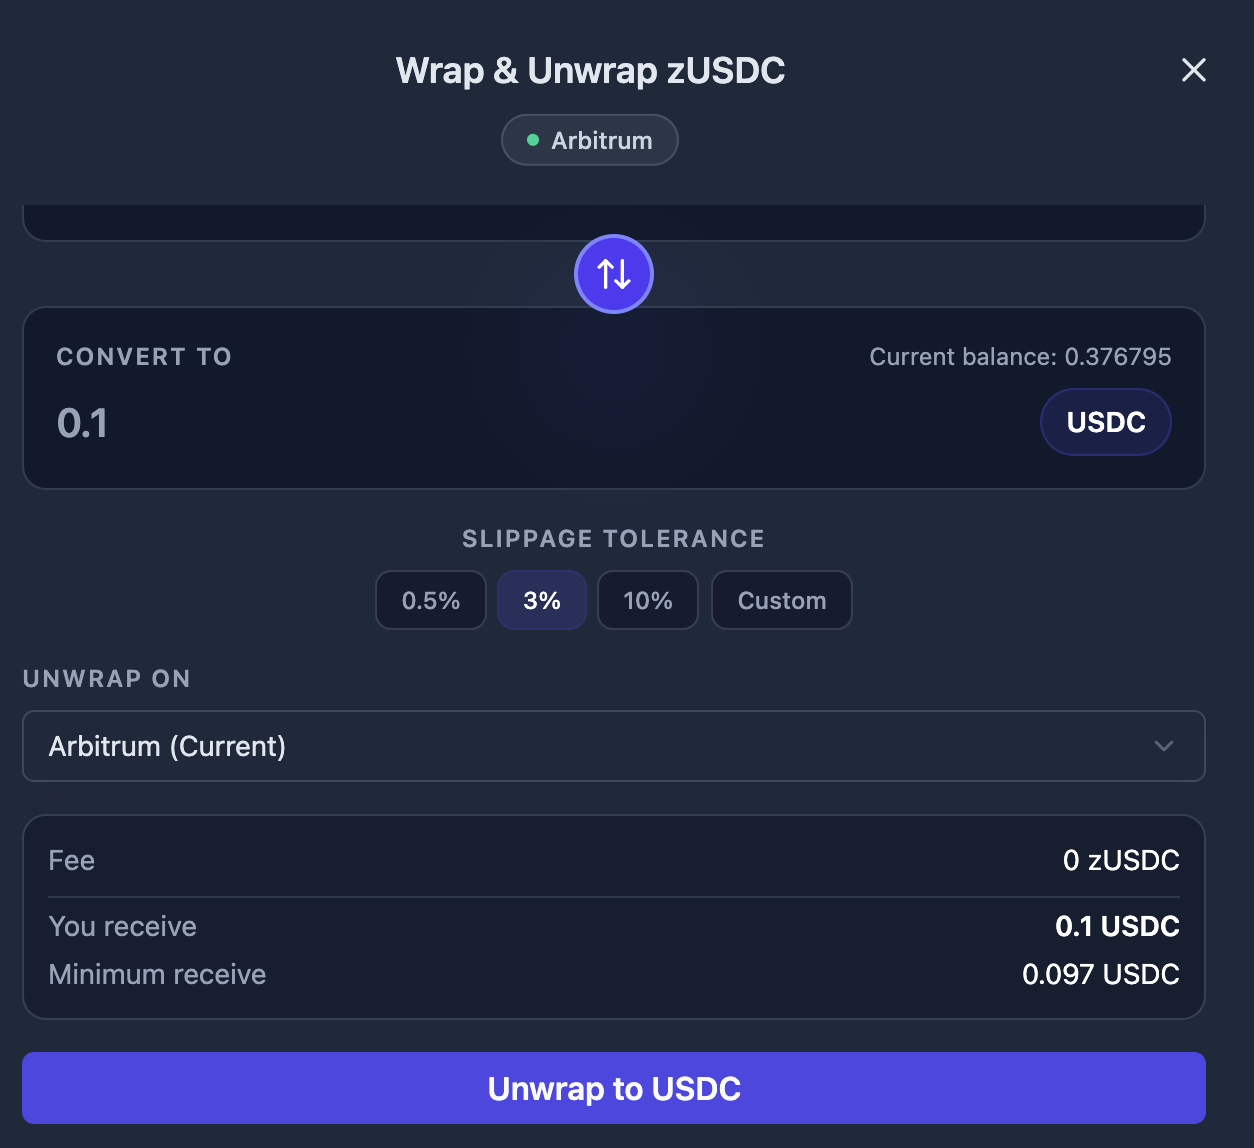
Select your current chain (shown as "Chain (Current)") to receive the underlying tokens on the same chain.

<figure><img src="https://4045326033-files.gitbook.io/~/files/v0/b/gitbook-x-prod.appspot.com/o/spaces%2FPzVlZxykzlnrD14epWVc%2Fuploads%2Fgit-blob-e9dfc01aba8ccf78132bd75e22a2b9e0f3292ae5%2Funwrap-same-chain.png?alt=media" alt="Unwrap Same Chain" width="480"><figcaption><p>Unwrap to current chain</p></figcaption></figure>

**Cross-Chain Unwrap:**

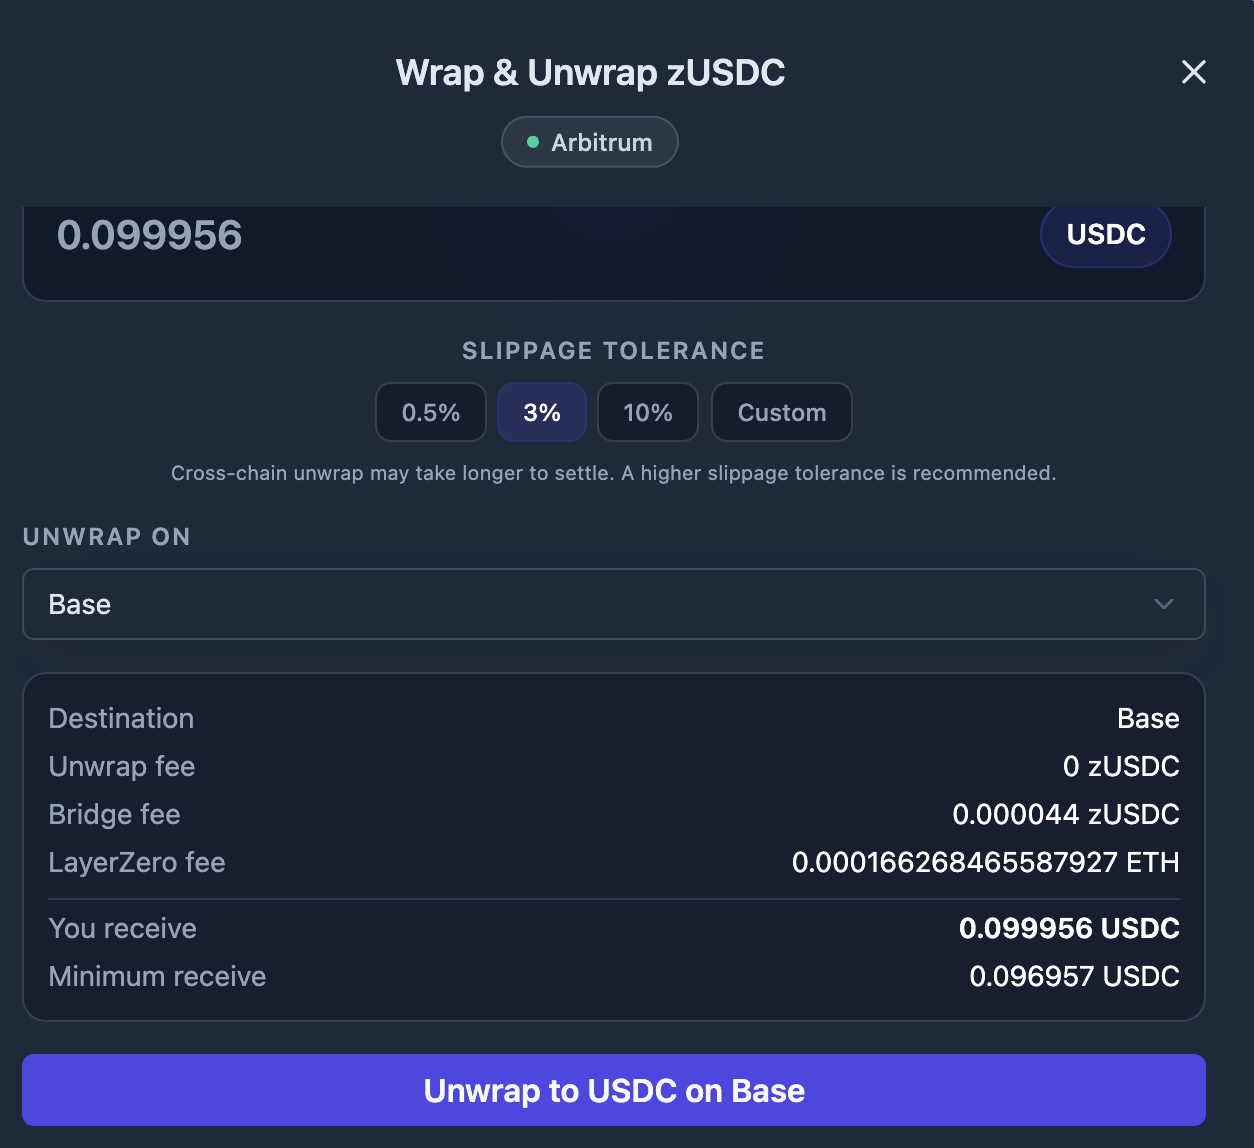
Select a different chain from the "UNWRAP ON" dropdown to access liquidity on another chain. The process works as follows:

1. Your zERC20 tokens are bridged from your current chain (Chain A) to the destination chain (Chain B) via LayerZero
2. On Chain B, the tokens are unwrapped to the underlying asset (e.g., USDC)
3. The underlying tokens are bridged back to your current chain (Chain A)

For example, if you're on Arbitrum and select "Base" as the unwrap destination, the flow is: **Arbitrum → Base → Arbitrum**. You receive the underlying tokens on Arbitrum, but the unwrap happens on Base.

<figure><img src="https://4045326033-files.gitbook.io/~/files/v0/b/gitbook-x-prod.appspot.com/o/spaces%2FPzVlZxykzlnrD14epWVc%2Fuploads%2Fgit-blob-5960d3e90b35bac7d3ed27e1df397a00304e9a13%2Funwrap-cross-chain.png?alt=media" alt="Unwrap Cross Chain" width="480"><figcaption><p>Cross-chain unwrap using liquidity from another network</p></figcaption></figure>

The fee breakdown (unwrap fee, bridge fee, LayerZero fee) is shown before confirming the transaction.

> **Fee Optimization**: If unwrap fees are high on your current chain due to low liquidity, cross-chain unwrap lets you access liquidity from another chain with lower fees. The frontend shows fee comparisons so you can choose the best option. See [Fees and Rewards](/zerc20/for-users/fees-and-rewards.md) for details.

> **Local-mode zJPYC**: zJPYC does not currently use the Hub-backed cross-chain route. When using zJPYC, the recipient / unwrap chain selector is scoped to the connected local-mode chain, such as Polygon Amoy or Kairos on testnet.

### Unwrap History

After executing a cross-chain unwrap, you can track its progress in the **History** tab of the Wrap / Unwrap dialog.

| Status         | Meaning                                                                 |
| -------------- | ----------------------------------------------------------------------- |
| **In Transit** | Tokens are being bridged via LayerZero / Stargate                       |
| **Finalizing** | Tokens have arrived on the destination but the status is still updating |
| **Completed**  | Unwrap is fully complete                                                |

The History tab auto-refreshes when you reopen it. After a cross-chain unwrap, the frontend polls for the LayerZero Scan index update automatically, showing "Waiting for LayerZero Scan to index your latest transfer..." until the entry appears.

> **Tip:** If the history looks stale after switching chains, the tab automatically clears and re-fetches data for the newly selected chain.
>
> If there is no cross-chain unwrap history for the selected chain yet, the tab stops loading and shows **No History**.

### Recovering Stuck Funds

In rare cases, a cross-chain unwrap may fail partway through (e.g. due to temporary Stargate liquidity shortage). When this happens, your funds remain safely in the destination chain's Adaptor contract.

The frontend detects stuck funds automatically and displays an amber **Recoverable Balances in Adaptor** banner at the top of the History tab. To recover:

1. Open the **Wrap / Unwrap** dialog and go to the **History** tab
2. If the stuck funds are on a different chain, click **"Switch to \<chain>"** to switch networks first
3. Click the **Withdraw** button next to each stuck balance
4. Confirm the transaction in your wallet
5. The recovered funds are returned to your wallet

> **Note:** Stuck funds are safe — they remain in the Adaptor contract and can be recovered at any time. After a successful withdrawal, the banner updates immediately and removes balances that reached zero.

## Step 4: Make a Private Transfer

See [Private Transfer Guide](/zerc20/for-users/getting-started/private-transfer.md) for detailed instructions on sending.

See [Scan Receives Guide](/zerc20/for-users/getting-started/scan-receives.md) for instructions on receiving transfers.

### Gasless Redeem

When you receive a private transfer, the frontend can optionally use a relay node to submit the redeem transaction for you. This is useful when your destination wallet does not already hold native gas on that chain.

* Enable **Gasless Redeem** in the receive flow
* Review the redeem fee, quoted relay fee, and the minimum amount you will receive (`redeem total - redeem fee - max relay fee`) before approving
* Sign the fee authorization with your wallet
* The relay node submits the redeem transaction and returns a transaction hash

See [Scan Receives Guide](/zerc20/for-users/getting-started/scan-receives.md) for the full redeem flow.

### Get Gas

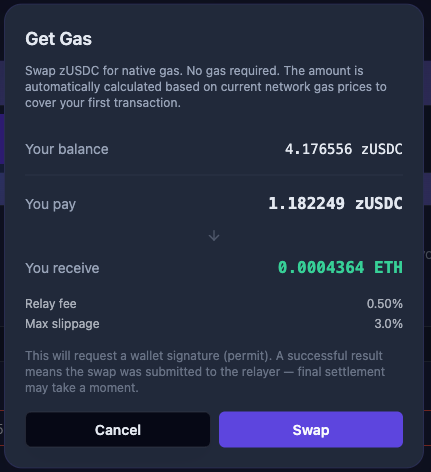
The connection card includes a **Get Gas** action for supported tokens. This opens a relay-backed swap flow that converts zERC20 into the selected chain's native token.

<figure><img src="https://4045326033-files.gitbook.io/~/files/v0/b/gitbook-x-prod.appspot.com/o/spaces%2FPzVlZxykzlnrD14epWVc%2Fuploads%2Fgit-blob-b36f01cb284e7a1d6cb5e01e0ac952c9800a3133%2Fget-gas-dialog.png?alt=media" alt="Get Gas Dialog" width="420"><figcaption><p>Get Gas dialog — review balance, pay amount, receive amount, relay fee, and slippage in a single view</p></figcaption></figure>

Typical flow:

1. Click **Get Gas**
2. Review the quoted native output and slippage-protected minimum
3. If the quote shows a fallback-price warning, review it carefully before continuing
4. Sign the ERC-2612 permit
5. Wait for the relay to submit the swap transaction

> **Note:** The success message indicates that the swap transaction was submitted to the chain. It is not a guarantee that the transaction has already been mined successfully.

For zJPYC on Kaia/Kairos, Get Gas uses relay-side price feeds for both `JPY/USD` and `KAIA/USD`. If quotes fail on Kairos, refresh once and retry; persistent failures usually indicate an RPC or oracle connectivity issue rather than a wallet issue.

## Important Notes

* **Crosschain Capability**: Most supported tokens can send on one chain and withdraw on another using LayerZero messaging. Local-mode tokens such as zJPYC settle on the connected chain instead.
* **Processing Time**: Private transfers typically take 30 minutes to 1 hour on mainnet
* **Testnet Limitations**: On testnets, cross-chain transfers may take longer due to LayerZero instability. Local-mode zJPYC does not wait for LayerZero, but it can still be delayed by RPC or indexer issues.

## Next Steps

* [Private Transfer (Frontend)](/zerc20/for-users/getting-started/private-transfer.md) — Send and receive privately
* [FAQ](/zerc20/for-users/faq.md) — Common questions and troubleshooting


---

# Agent Instructions
This documentation is published with GitBook. GitBook is the documentation platform designed so that both humans and AI agents can read, navigate, and reason over technical content effectively. Learn more at gitbook.com.

## Querying This Documentation
If you need additional information that is not directly available in this page, you can query the documentation dynamically by asking a question.

Perform an HTTP GET request on the current page URL with the `ask` query parameter, and the optional `goal` query parameter:

```
GET https://zerc20.gitbook.io/zerc20/for-users/getting-started.md?ask=<question>&goal=<endgoal>
```

`ask` is the immediate question: it should be specific, self-contained, and written in natural language.
`goal` is optional and describes the broader end goal you are ultimately trying to accomplish on behalf of the user. GitBook uses it to tailor the answer towards what is most useful for that goal.

The response will contain a direct answer to the question and relevant excerpts and sources from the documentation.

Use this mechanism when the answer is not explicitly present in the current page, you need clarification or additional context, or you want to retrieve related documentation sections.